Note: This document is work-in-progress. Feel free to contact us at klaus@lp-research.com or yasmine@lp-research.com for feedback and corrections.
We are on Slack, please join the discussion! Email us to request access.
Some Advantages of Visual SLAM
It is cost efficient, cameras are commodity items (tens or hundreds of USD compared to thousands of USD for a LIDAR)
Cameras have no moving parts, they are low maintenance, compared to LIDARs less sensitive to vibrations and shocks
Visual SLAM uses a 3D feature space compared to the 2D scans of most affordable LIDARs
This allows visual SLAM to do instant re-localization e.g. after a system restart, manual displacement or occlusion
There are no range limitations. Visual SLAM works indoors and outdoors.
Cameras can perform additional image processing tasks such as object recognition and combine this information as additional feature data with standard visual SLAM features.
We are showing some of these features in this video: https://vimeo.com/451375902
System Overview
LPSLAM is a drop-in solution to connect the ROS Navigation 2 (NAV2) stack with OpenVSLAM-based visual SLAM. Additionally to the basic capabilities of OpenVSLAM, LPSLAM contains improved functionality such as camera calibration utilities and the ability to feed odometry information back into OpenVSLAM to improve tracking robustness.
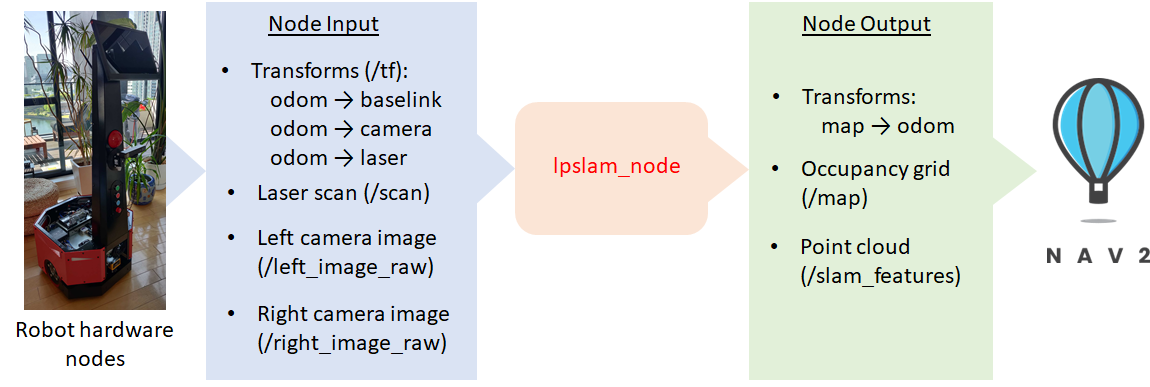
LPSLAM uses sensors commonly installed in an AGV to create an environement map and to localize the robot within that map. The image below shows an overview of such a system. The central part of this system is the NAV2 stack with its path planning capabilities.
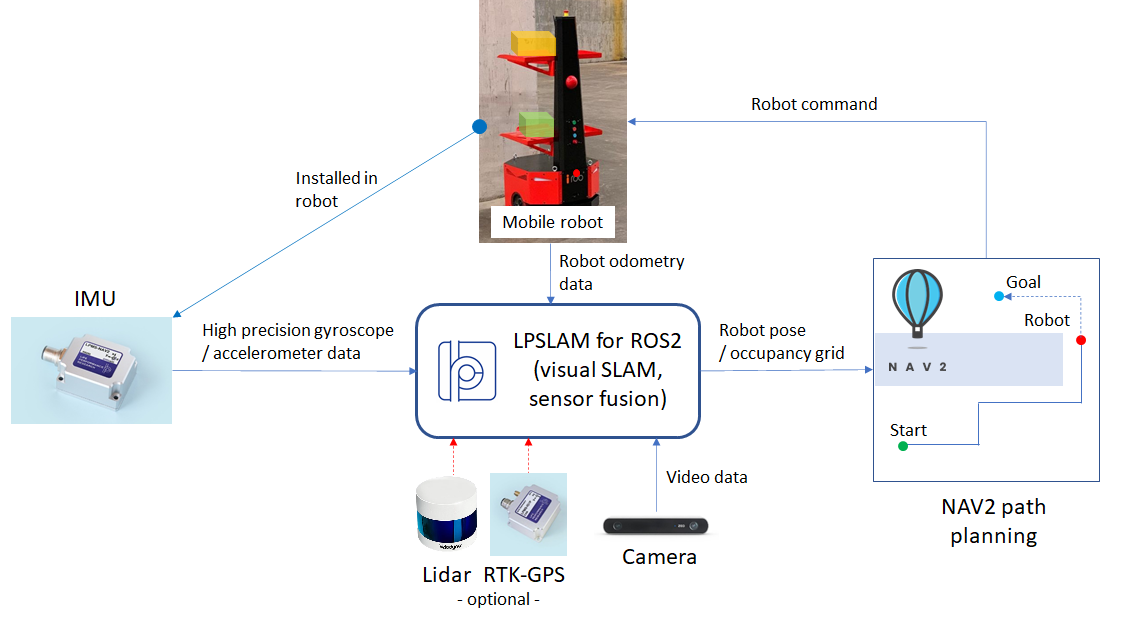
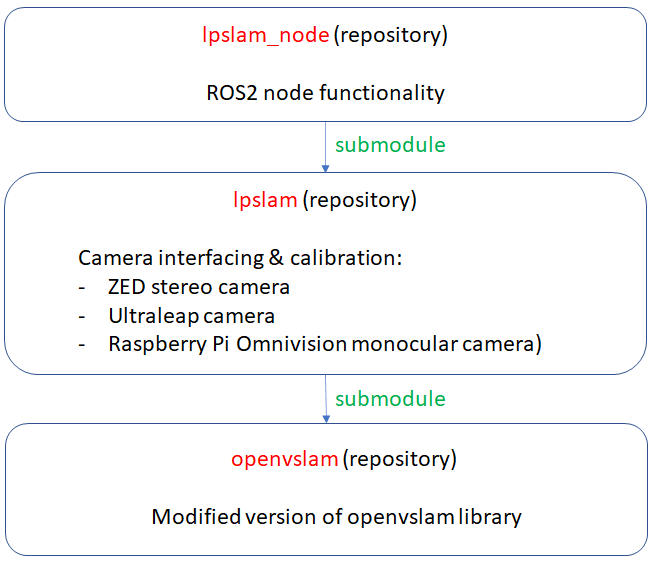
LPSLAM is a ROS2 node and consists of 3 parts:
lpslam_nodethat provides the ROS2 node interfacelpslamcontaining camera interfacing and calibration functionalityA modified version of
OpenVSLAM
How to Transmit Localization Data to ROS Navigation 2
Before we get into the specifics of LPSLAM, we would like to show some relevant information about how a SLAM node communicates with the Navigation 2 stack. Generally, communication between localization and ROS Navigation 2 happens via /tf (transform) messages as described in the Navigation 2 documentation:
Setting Up Transformations — Navigation 2 1.0.0 documentation (ros.org)
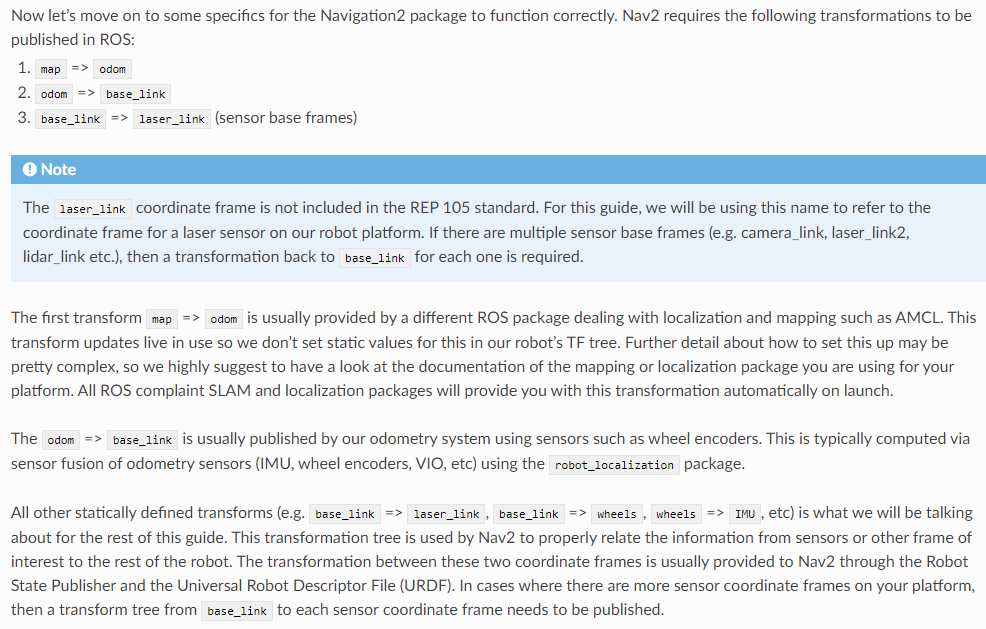
Specifically about interacting with a SLAM node, the Navigation 2 documentation says the following:
Besides the localization data in the form of the map => odom transform, a 2D map of the environment needs to be provided to NAV2 via /map messages. At the moment this map is created inside LPSLAM from 2D laser scanner data. We will put this functionality into a separate module as different map creation methods might be preferable for different use-cases. Generally one of the main advantages of using visual (camera) SLAM for navigation is its capability to replace LIDAR SLAM, as LIDARs tend to be expensive and sensitive to vehicle vibrations.
LPSLAM Node Core Features
Wraps OpenVSLAM as ROS 2 node
Provides camera calibration and matching of left / right image for stereo cameras
Enhances robustness of standard OpenVSLAM by using robot odometry / IMU information
Combines optical keyframes with distance sensor information (LIDAR) to create occupancy grid (to be replaced by map building using camera feature points)
Outputs detected optical features as point cloud
The LPSLAM ROS2 node receives as input:
Odometry transforms
/tfSensor data from a camera and laser scanner
/scan, /left_image_raw, /right_image_raw
It outputs:
The map-odom transform
/tfThe environment map (occupancy grid)
/mapResult features from visual SLAM as point cloud
/slam_features
Note: For our default test setup we use a Stereolabs ZED 2 camera.
Build instructions
Note: Thank you to Alexey Merzlyakov and Yasmine Mili for contributing to these.
Repository Links
https://github.com/lp-research/openvslam ( branch: feature/lpr-mods)
We’re going to cover two ways to build our OpenVSLAM-ROS wrapper and its dependencies. Below are the common build instructions followed by the specific instructions for each one.
Build dependencies with conan package manager
Build dependencies manually
Common build instructions
Dependencies
The general build instructions for OpenVSLAM are here:
https://openvslam-community.readthedocs.io/en/latest/installation.html
The installed dependencies should be sufficient to build our branch of OpenVSLAM, the LPSLAM repository and the ROS2 wrapper.
Required
Conan
pip3 install conan
g2o dependencies
sudo apt install libsuitesparse-dev
sudo apt install qtdeclarative5-dev
sudo apt install qt5-qmake
sudo apt install libqglviewer-dev-qt5
Pangolin dependencies
sudo apt install libgl1-mesa-dev
sudo apt install libglew-dev
sudo apt install cmake
Other dependencies
sudo apt install libyaml-cpp-dev
sudo apt install libatlas-base-dev libsuitesparse-dev
sudo apt install libgoogle-glog-dev libgflags-dev
sudo apt install libgtk2.0-dev pkg-config
OpenCV (latest > 3.0.0)
https://docs.opencv.org/4.5.3/d7/d9f/tutorial_linux_install.html
To install OpenCV in a custom $INSTALL_ROOT, set -DCMAKE_INSTALL_PREFIX
wget -O opencv.zip https://github.com/opencv/opencv/archive/master.zip
unzip opencv.zip
mkdir -p build && cd build
cmake -DCMAKE_INSTALL_PREFIX=$INSTALL_ROOT ..
cmake --build .
make install
ROS2
Use one of the standard ways to install ROS2 (latest distribution Galactic on Ubuntu 20LTS at the time of writing)
https://docs.ros.org/en/galactic/Installation.html
For building on a Jetson embedded system we recommend this script (distribution Foxy on Ubuntu 18LTS):
https://github.com/griz1112/build-ros2-foxy-for-jetson.git
Make sure to source ROS2 e.g. for a Galactic build:
. ~/ros2_galactic/install/local_setup.bash
In case you installed ROS2 from binaries:
Install colcon
sudo apt install python3-colcon-common-extensions
Source ROS2 as follows
source /opt/ros/galactic/setup.bash
LPSLAM ROS2 message interfaces
git clone https://github.com/lp-research/lpslam_interfaces
cd lpslam_interfaces
colcon build --symlink-install
source ./install/setup.bash
Conan Build Instructions
(Recommended)
The instructions below build the OpenVSLAM-ROS wrapper and install the remaining dependencies automatically in the workspace with conan package manager
OpenVSLAM-ROS Wrapper
Make sure to source ROS2 & lpslam_interfaces beforehand.
. ~/ros2_galactic/install/local_setup.bash
source lpslam_interfaces/install/setup.bash
git clone https://github.com/lp-research/lpslam_node.git
cd lpslam_node
git submodule update --init --recursive
cd lpslam/conan-packages
. install_all.sh
cd ..
git pull origin main
cd ..
colcon build --symlink-install \
--cmake-args -DUSE_PANGOLIN_VIEWER=ON -DUSE_SOCKET_PUBLISHER=OFF \
-DBUILD_WITH_MARCH_NATIVE=OFF -DCMAKE_LIBRARY_PATH=${INSTALL_ROOT}/lib \
-DLPSLAM_BUILD_OPENVSLAM=ON -DLPSLAM_BUILD_OPENVSLAM_PANGOLIN=ON
Some minor errors may be encountered depending on the system, below are the fixes
"cannot find -lopengl_helper" when building g2o can be fixed by setting G2O_USE_OPENGL=True Here then sourcing the packages again.
cd lpslam/conan-packages
. install_all.sh
(particularly happened with opencv-4.2.0) can be fixed by changing it to #include <opencv4/opencv2/ccalib/omnidir.hpp>
Problems loading some libraries when running the node.
error while loading shared libraries: ... .so : cannot open shared object file: No such file or directory
Can be solved by appending theLD_LIBRARY_PATHwith the path to the new libraries as follows:LD_LIBRARY_PATH=$LD_LIBRARY_PATH:$INSTALL_ROOT/libor usingldconfig.
Manual Build Instructions
The manual build is work in progress.
Dependencies
Below are the instructions to build the dependencies one by one from source and install them in a custom ${INSTALL_ROOT}.
If no custom root is provided, the dependencies will be installed system wide (default to /usr/local ), use sudo make install to install them in this case.
Pangolin
https://github.com/stevenlovegrove/Pangolin @ad8b5f83 commit
git clone https://github.com/stevenlovegrove/Pangolin.git
cd Pangolin
git checkout ad8b5f83
mkdir build && cd build
cmake -DCMAKE_INSTALL_PREFIX=$INSTALL_ROOT ..
cmake --build .
make install
Eigen
https://gitlab.com/libeigen/eigen.git @3.3 branch
git clone https://gitlab.com/libeigen/eigen.git
cd eigen
git checkout 3.3
mkdir build && cd build
cmake -DCMAKE_INSTALL_PREFIX=$INSTALL_ROOT ..
cmake --build .
make install
DBoW2
https://github.com/OpenVSLAM-Community/DBoW2 @master branch
git clone https://github.com/OpenVSLAM-Community/DBoW2.git
cd DBoW2
mkdir build && cd build
cmake -DCMAKE_INSTALL_PREFIX=$INSTALL_ROOT ..
cmake --build .
make install
g2o
https://github.com/RainerKuemmerle/g2o @9b41a4e commit
git clone https://github.com/RainerKuemmerle/g2o.git
cd g2o
git checkout 9b41a4e
mkdir build && cd build
cmake \
-DCMAKE_INSTALL_PREFIX=${INSTALL_ROOT} \
-DCMAKE_BUILD_TYPE=Release \
-DCMAKE_CXX_FLAGS=-std=c++11 \
-DBUILD_SHARED_LIBS=ON \
-DBUILD_UNITTESTS=OFF \
-DBUILD_WITH_MARCH_NATIVE=OFF \
-DG2O_USE_CHOLMOD=OFF \
-DG2O_USE_CSPARSE=ON \
-DG2O_USE_OPENGL=ON \
-DG2O_USE_OPENMP=ON \
..
cmake --build .
make install
glog
https://github.com/google/glog.git @master branch
There seems to be an issue with the latest glog and OpenCV (2021/8/30):
https://bugs.freebsd.org/bugzilla/show_bug.cgi?id=255968
therefore use default Ubuntu package libgoogle-glog-dev:
sudo apt install libgoogle-glog-dev
OpenVSLAM
git clone https://github.com/lp-research/openvslam.git
cd openvslam
git checkout feature/lpr-mods
mkdir build && cd build
cmake \
-DBUILD_WITH_MARCH_NATIVE=OFF \
-DUSE_PANGOLIN_VIEWER=ON \
-DUSE_SOCKET_PUBLISHER=OFF \
-DUSE_STACK_TRACE_LOGGER=ON \
-DBOW_FRAMEWORK=DBoW2 \
-DBUILD_EXAMPLES=ON \
-DBUILD_TESTS=ON \
-DINSTALL_PANGOLIN_VIEWER=ON \
-DCMAKE_BUILD_TYPE=Release \
-DCMAKE_INSTALL_PREFIX=${INSTALL_ROOT} \
..
make
make install
OpenVSLAM-ROS Wrapper
Make sure to source ROS2 & lpslam_interfaces beforehand
. ~/ros2_galactic/install/local_setup.bash
source lpslam_interfaces/install/setup.bash
git clone https://github.com/lp-research/lpslam_node.git
git submodule update --init --recursive
colcon build --symlink-install \
--cmake-args -DUSE_PANGOLIN_VIEWER=ON -DUSE_SOCKET_PUBLISHER=OFF \
-DBUILD_WITH_MARCH_NATIVE=OFF -DCMAKE_LIBRARY_PATH=${INSTALL_ROOT}/lib \
-DLPSLAM_BUILD_OPENVSLAM=OFF -DLPSLAM_BUILD_OPENVSLAM_PANGOLIN=OFF
Testing Your Setup
Testing LPSLAM on Simulation
One quick way to test LPSLAM is run it on simulation. We created a Turtlebot3 Waffle simulation with Stereo Camera just for that! We also provide the needed launch and configuration files for lpslam integration.
To test it, create a workspace for tb3 simulation eg.
tb3_ws, clone the following repositories then install the dependencies and build your workspace.
cd ~/tb3_ws/src
git clone -b  lpr-stereo https://github.com/ItsJas/turtlebot3_simulations.git
git clone -b  lpslam-integration https://github.com/ItsJas/turtlebot3.git
cd ..
rosdep install --from-paths src --ignore-src -r
colcon build
source ./install/setup.bash
To run lpslam on simulation, all you need to do is the following,
Run the tb3 simulation with the waffle_stereo model
source /usr/share/gazebo/setup.bash
export TURTLEBOT3_MODEL=waffle_stereo
ros2 launch turtlebot3_gazebo turtlebot3_house.launch.py
Source the lpslam and lpslam_interfaces packages then run the lpslam node with the proper configuration.
For the configuration files, make sure to change the path forconfigFromFileandvocabFilehere.
source  path_to_lpslam_ws/lpslam_interfaces/install/setup.bash
source  path_to_lpslam_ws/lpslam_node/install/setup.bash
ros2 launch turtlebot3_lpslam lpslam_gazebo.launch.py
Finally, run teleoperation node to move the robot around
ros2 run teleop_twist_keyboard teleop_twist_keyboard
# Or
ros2 run turtlebot3_teleop teleop_keyboard
Note: We provide a vocab file (orb_vocab.dbow2) temporarily to make things fast but it can be easily generated. Refer to the following discussion.
Testing LPSLAM on Your Robot
Coming soon..